Category Archives: Projects

Galley Refit 2020

In the spring of 2008, we bought a custom wooden catamaran built in the Netherlands in 1991 named Take Two. This is what the galley looked like:

Original Galley (2008)
First view of galley, December 2007

We lived with it for a couple of years so we would have time to think about what we really wanted/needed in a galley. I love food preparation and spend hours each day in the galley cooking homemade meals and baking bread and goodies from scratch, so this is an important part of our life afloat. It’s why we chose a boat with a galley-up instead of galley-down (in the hull). If I’m going to be in the galley, I still want to be a part of the action.

What we loved was the light and space; what we hated was the Bosch electric cooktop (50 hz) that required a generator run for cooking, the small marine fridge and freezer, the dishwasher, and the grey formica countertop. After our first cruise to the Bahamas in 2010, we came back to Florida for a refit after Rachel was born in spring of 2011. We switched to marine plywood/teak veneer countertops, standard-size propane gas stove/oven, and AC under-counter fridge and freezer. We got rid of the dishwasher, build storage drawers and installed a washing machine under the chart table. It was a significant improvement.

Galley (since 2011)
Galley Refit 2011

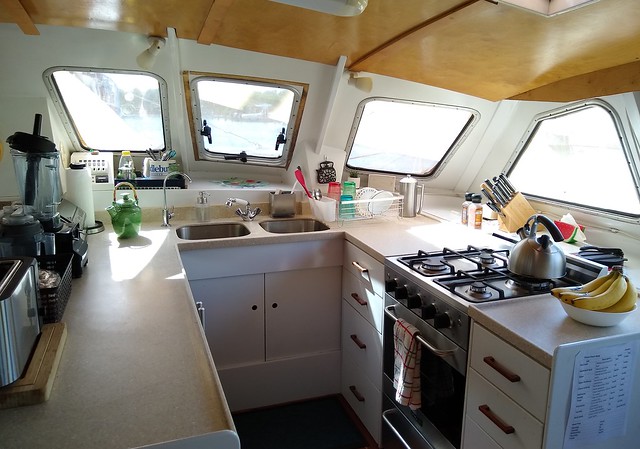
It was beautiful and functional, but not as durable as we needed. The appliances lasted 9 years before rust started to affect the stove’s safe operation, and the moisture around the sink caused the countertops to rot. I was sad to see the pretty wood go, but the new solid surface countertops are really beautiful! I love the new stainless outdoor-grade refrigerator and freezer, the new stove/oven with extra safety features, and the undermount sinks with integrated draining board. This will (hopefully) be our last upgrade!

Galley (refit 2020)
Galley Refit 2020
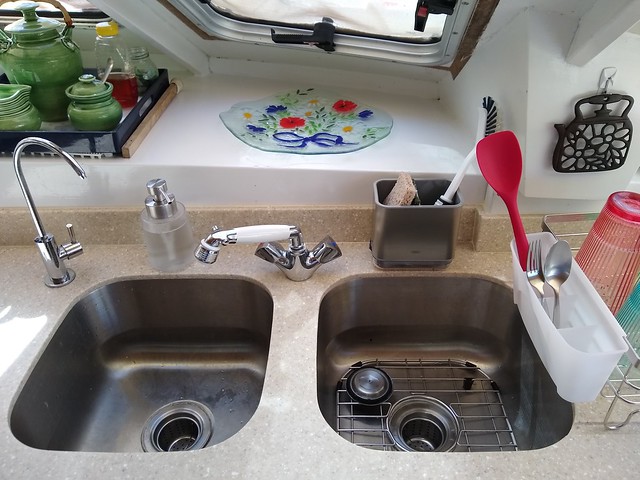
New Undermounted Sink
Undermount stainless sinks, integrated draining board to the right
New Fridge/Freezer
U-Line Stainless Fridge and Freezer
New Stove/Oven
Unique Stainless Stove/Oven with Cast Iron Grates

For more photos of the demolition, before-and-after shots, and details, click here (or any photo) and it will take you to our flickr photostream. So far, so good…I’m really enjoying the new galley!

New Oven Interior
First batch of cookies in the new oven!

Code Zero

When we bought Take Two, she was a lean, mean sailing machine. We tacked back and forth toward the mouth of the Manatee River and sailed across Tampa Bay on weekends and learned how to make her go fast. We used our spinnaker on calm days for a downwind run. We outran afternoon thunderstorms.

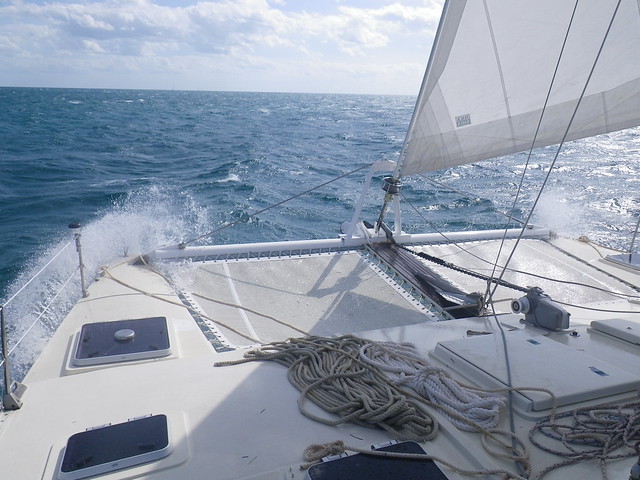
Sailing in 20 knots

And then we moved aboard.

We brought tools, spare parts, books, cast iron skillets, 5-gallon buckets of grain, scuba tanks—and, how could I forget? —five kids and all their clothes, toys, sporting equipment, and sundry items. “And sundry items” raised our water line 6 inches over time, and now our sleek sailboat is a fat cat. It takes a lot of wind to get her going. On passages, we don’t even bother to raise the main unless it’s blowing a steady 15 knots. Sure, we might be motor sailing with the jib out, but when the wind drops to 10 knots? Fuhgeddaboudit.

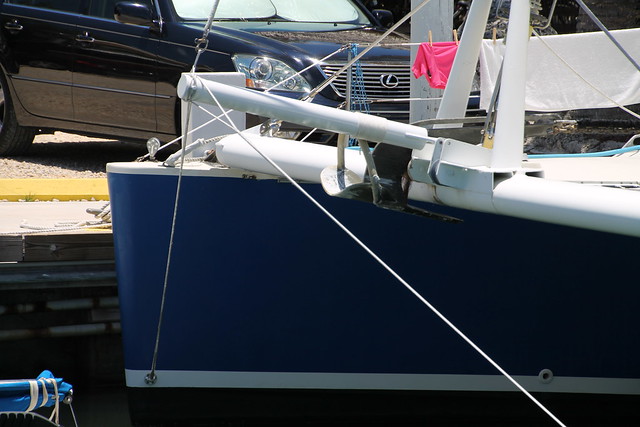
That all changed when we commissioned a Code Zero from Calvert Sails before we left for the Caribbean. We had added a crane to the top of the mast and a bowsprit to accommodate the new sail when we refurbished the rig in Fort Pierce (Spring 2015).

IMG_5341

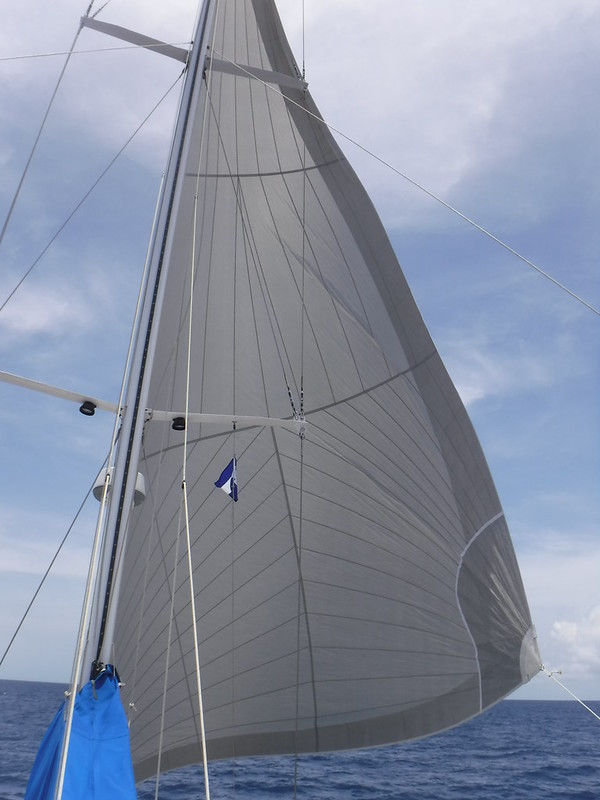
We hoisted it for the first time on New Year’s Day 2016, and as it rolled out in all its glorious enormity, I heard angel choirs. We were hoping it would turn Take Two back into a sailboat, and we have not been disappointed. It is a reaching sail that fills the gap between our foresail (a genoa) and our spinnaker. We intended to use it for light upwind sailing and heavier downwind reaches.

Code Zero

We sailed across the Bahama banks in March in 15-20 knots of wind and fairly flew along the leeward coast of New Providence, seeing 10-11 knots of boat speed. When the wind started to pick up, we swapped it for the genny, not wanting to be overpowered. Good thing, too, because we saw nearly 40 knots on the banks that afternoon as we approached the anchorage at Highbourne Cay.

After that day, we wrestled it down into a locker (to protect it from the sun) and didn’t see it again for a long, long time as we bashed eastward toward the Caribbean’s Leeward Islands. Once we reached the Windwards, we discovered that the trade winds were too strong or too southerly to fly the Zero, so it stayed coiled away for another day while we sailed with reefed main and jib.

That all changed as we began the next leg of our Caribbean circle. Heading north from Grenada, we sailed fast beam reaches to St. Vincent and the Grenadines and St. Lucia, rolling out the Zero when the wind grew light, sometimes ghosting along at half-windspeed in 10 knots of breeze. Heading west from St. Lucia, it’s all downwind, so we expected to use the Zero a lot.

On our way to Bonaire in November 2016, we learned something important about that sail. We had raised, and then subsequently lowered, the mainsail after sloppy seas caused it to bang around too much. We hoisted the Zero without the main and seemed to have a lot of success. Until we hit some squally weather one night during my watch, when I decided to wake Jay to help me furl it. Without the main to blanket the huge sail, all the pressure of 25-30 knots of wind made it nearly impossible to furl. I was easing the sail as Jay furled the continuous line, but as the top and bottom of the sail rolled tightly, the middle caught the wind and bagged and ballooned. Jay was pulling as fast and hard as he could, but if he paused for even a moment, all ground was lost. Of course, it was night-time, he had been awakened from a dead sleep, and had never considered how hard the job would be, so he wasn’t even wearing gloves. We eventually got it sloppily rolled, and then dropped it onto the trampolines. As his hands blistered and bled, we learned a hard lesson—the Code Zero never goes up without the main (and, sailing gloves are not just for race crew).

We used the sail again heading west from San Blas during a period of light wind in January 2018, and, most recently, to sail from Guanaja to Roatan, Bay Islands of Honduras. The wind was directly behind us at about 10 knots. We considered using the spinnaker, but it shares a halyard with the Zero, which was still rigged since our sail from Grand Cayman. Though we swore never to fly the Zero without the main up, it seemed like the perfect light wind day to try it. And it was lovely—quietly swishing through indigo seas instead of listening to the drone of a motor or worrying about the spinnaker folding in on itself as it sometimes does in ocean swells. I went with the kids and lay on the trampolines in the shade and echo of that great sail and enjoyed a gorgeous day on the water. Though we’re still straightening out the proverbial (and sometimes literal) wrinkles, we have grown to love the Code Zero.

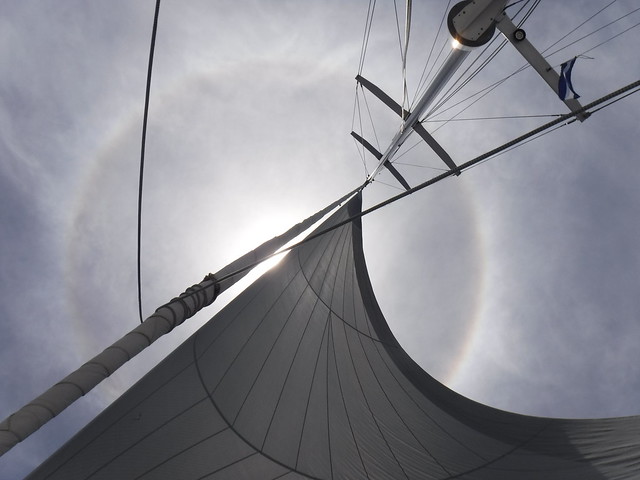
Sun Dog

A Perfect Kitchen Faucet

The summer project schedule is in full swing.  We’re in the process of commissioning the big ones requiring wood and fabric work beyond our time and skill, and there are also a bunch of little ones that we are equally excited about.  

One of the little ones that we are unduly excited about is the new galley faucet I put in yesterday.  It may seem mundane, but it is a huge improvement and we can’t believe we didn’t do it before.  

The old one was a standard household “pull-out spray” faucet.  We had several complaints about it, all of which center on water and energy conservation.  First, the faucet was a “single lever” type.  It probably doesn’t bear explanation, but the lever is raised and lowered to control flow, and articulated left and right to control temperature.  It was a challenge for us to keep the lever pointed all the way over to the cold side to avoid unnecessarily mixing in our hot water.  It was also natural to simply flip the lever up to full height to turn on the water, especially for the kids, who often wash their hands in the kitchen sink.  You really had to consciously think about using less water, and as a result the faucet was often on full flow unnecessarily.  

The primary purpose of the galley sink is washing dishes and this is where most of the water goes.  No matter how careful she was, Tanya was constantly using too much water or hot water.  The reason is because it was a three-handed job:  one to hold the article being washed, one to hold the spray handle, and one to turn the water on and off.  The result is that the water wasn’t turned off as often or as quickly as it should have been, and then it was turned back on with too much force or the wrong temperature.  

In a house these problems probably wouldn’t be noticeable, but every gallon counts on a boat, even one as lavish with power and water as ours.  So we started looking for a new faucet with three basic requirements: separate hot & cold valves, a way to regulate the flow unrelated to turning it on or off, and a pause button on the handle.  

You can go to Lowe’s or Home Depot and see a whole wall of faucets.  Our old one is there.  If you remove the cosmetic factors, there are very few differences between them.  That alone says something about all of us as consumers.  Of the features that we had determined were essential to water and energy conservation on our boat, the only one offered by this wall of faucets displayed to millions and millions of homeowners was the separate hot & cold valves.  And most probably view that as a cosmetic choice.  I think that says something else.

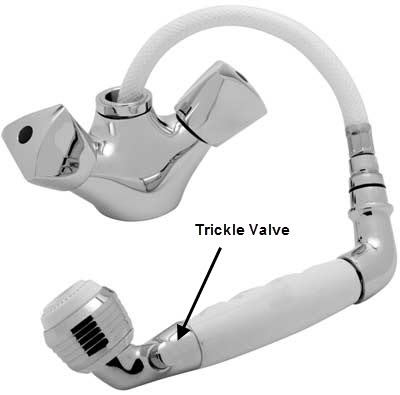
We did find a new faucet that satisfied our requirements.  It was in our bathroom.  It is made by ShurFlo, a company that markets products for marine and RV use.  They make many faucets, but only one that has the crucial pause button.  They call it a “trickle valve”, but it can be used to effectively stop the flow (not entirely, hence the “trickle” name) with one hand while using the spray handle.  It can also be partially engaged to restrict the flow, and the setting persists between uses.  Perfect for kids and hand washing.  We bought this great faucet (model #135-0204-CW) by accident.  It happens to be their least stupid-looking.  

One quirky thing about it is that the knobs aren't quite intuitive.  In our opinion the knobs turn the wrong direction or the hot is on the wrong side, depending on what direction the faucet body faces.  So we face the faucet the way we want the knobs to turn and swap the little red and blue markers to put hot on the side we want.

We’re expecting this new faucet to yield big benefits on our next cruise.  Less water use means less time running the water maker (and less noise), means more net power from the solar panels, means less generator run-time (and less noise), means more time between trips to the fuel dock.  Conserving the hot water is important if we’ll be reducing generator run-time since that is how we heat it.

Automatic Generator Start


This morning I was very pleased with myself because thegenerator started all by itself.  Lastnight I installed a little gadget for that purpose and it worked beautifully.

Starting the generator automatically has always been on theproject list, but seemed like a solution looking for a problem, so it nevermade it near the top.  It wasn’t until wemoved aboard and spent some time away from the dock and shore power that werealized that running the generator was an essential part of our power diet.  If nobody were here to start the thing, ourbatteries would die and the refrigeration would shut down.  It meant we couldn’t leave, and suddenly anautomatic generator start became more important.

Yes, we have a large solar array, no, it isn’t enough, andyes, our refrigeration is grossly inefficient. 
If we were going to be gone for a long period, we would probably throwaway all the food and turn the refrigerators off.  But if we only want to be gone for a fewdays, it’s better to keep everything running while we’re gone.

Another part of the problem was finding the right unit.  It is most common to find the generator startcapability as an optional add-on to higher-end inverters.  Our inverters have the capability, but notthe option, and they’re too old to find the necessary module.  Plus, different generators have differentstarting requirements, and we needed a unit that had the flexibility to start our Northern Lights.

It wasn’t until the project received priority that a searchin earnest began.  It yielded a few hits,but none as clearly perfect as the GSCM from Atkinson Electronics.  A call to the company had one on the way $249later.  Installing it was really no moredifficult than looking at the back of the Northern Lights’ control panel andwiring the GSCM to the appropriate switch contacts.

Most of these units are designed to work off battery voltageto determine when the generator is needed for charging.  I could do better since I have a VictronBMV-600 battery monitor that watches the Amps flowing in and out and calculatesa precise depth of discharge.  Thebattery monitor allows me to set thresholds at which it will energize a relay,perfect for signaling an automatic generator start if the unit supports it,which the GSCM does.  I will add a Flexchargeprogrammable timer to institute quiet times when the generator can’t run. 
Typically I only want it to run between 9 and11am, and when the battery is below 85%.

If air-conditioning were important, I could also use thetimer to make the generator start on an interval, or use a demand device like athermostat to start it.  But that getsback into solving a problem that I don’t really have.

Chitty Chitty Bang Bang


I finally got a mechanic down to the boat last week.  I’ve been meaning to do this since before Ibought the boat, but never got around to it. 
I knew the news would be bad.  Dothey ever give good news?

[more]

The port engine is very hard to start.  It has to be cranked for 60-120 seconds (notcontinuously) before it will fire.  Whenit does, it only runs on one cylinder and understandably very rough.  After it has warmed up for a few minutes, theother cylinders will start to fire, after which it is fine and will run allday.

A diesel engine is pretty simple.  It doesn’t have spark plugs, but insteadrelies on the air in the cylinder being heated by compression and a fine sprayof fuel being injected into the cylinder at the right time to cause combustion.  Simple, but precise.  The piston has to fit perfectly in thecylinder to create the compression, and the fuel has to be sprayed at theperfect time, in the perfect pattern, and under very high pressure.

I have managed to put together a few pieces of the boat’sstory.  The engines were commissioned inNovember 2000 by a mechanic in Sarasota. 
This was interesting because I didn’t know the boat had ever been inthis area.  I have a logbook that starts ayear later in November 2001, in Fort Lauderdale, when the engines have 145hours on them.  The logbook containsseveral entries that indicate that the port engine had problems even then.  It mentions some “blow by” and that theengine was accidentally run with the raw water intake closed, causing it tooverheat.

The overheating back then could very likely be root cause ofmy problems today.  When metal gets hotit gets soft and expands.  Getting softcan lead to deformation, and expansion within the small tolerances of acylinder can lead to increased friction and wear (which leads to more heat andmore friction until your engine seizes). 
Overheating is not conducive for maintaining compression inside theengine. 

The “blow by” he notes is a compression problem, but isrelated to the rings at the top of the cylinder not fitting correctly andallowing gas to escape.  It is usually arelatively easy fix and not a long-term problem.

Generally, the first thing a mechanic wants to know when heencounters a diesel that won’t fire is if there is compression.  This can be done by removing the glow plugs (littleelectrodes that pre-heat the air in the cylinder for easier starting), fittinga pressure gauge, and cranking it.  It ishard to say what pressure is good and what is bad, but the cylinders should allbe about the same.  It is definitely bad whenyou have one cylinder that is 50% higher than the others, and that cylinderworks when the others don’t.  Alas, thisis the case.

It is a pretty safe bet that what is going on inside theengine is that the engine has to be turned over (either by the starter, or by the“good” cylinder) until the pistons heat up from enough friction to expand and thepressure rises enough to allow combustion. 
While the engine is turning over, the injectors are dumping fuel intothe cylinders, which washes away the lubricating oil.  This increases the friction and helps thecylinders to heat up and thus fire earlier, but it also causes wear and thestarting problem will get worse and worse until someday the engine just won’tstart.

What is the solution? 
Well, the piston has to be made to fit perfectly in the cylinder.  The cylinder therefore has to be bored larger(probably half a millimeter) and fitted with larger pistons, or the cylinderhas to be sleeved and re-bored to the original spec and the pistons replaced.  Of course this can’t be done in the boat so theengine has be removed and re-installed, adding about two days of labor.  Ballpark estimate: $4,000.

Now, this isn’t all that terrible in boat-money terms.  Where it gets complicated is when youconsider that after spending the four grand, I’ll still have a pair of tiredold 30 horsepower engines that really probably should have been 40s or 50s tobegin with.  The real question here is doI want to take this boat long-distance with these engines?  Ballpark estimate for two new 40HP engines andmatched propellers: $40,000.

The mechanic that did this compression test for me was thesame guy who commissioned the engines in 2000. 
I did that on purpose.  He helpedme collect some of the pieces of the history puzzle.  Also, he wrote in his 2000 report that theboat motored at 9 knots.  Now, I’ve spentsome time on this boat and the only time I’ve seen 9 knots is with a nicebreeze and a big sail.  The best I’veseen under power is about 5.5.  I wantedto meet the man who said this boat went 9 knots on these engines.  He verified that it did indeed happen andnoted that the engines did not achieve anywhere near their rated RPMs.

As I’ve alluded to before, there are many factors toconsider when trying to maximize boat speed and minimize fuel consumption.  The boat’s shape and weight areconstants.  The engine manufacturerconsiders the RPM a constant.  The gearratio is a constant.  There areenvironmental considerations such as temperature, wind, and sea state, but themain variable is the propeller.  Whatdiameter, how many blades, what blade pitch? 
Apparently, it is possible to pitch the propellers such that the boatcan go 9 knots, but the engines can’t turn them at the speed the manufacturersays is ideal.  How bad this is, I don’tknow.  I also note that however the propswere pitched then, and however they are now, the engines do run faster, butstill don’t get what the manufacturer considers “cruising speed”.

The boat has fancy feathering propellers that orientthemselves to the water when sailing to reduce drag.  They have adjustable pitch, but unfortunatelythe boat has to be pulled out to make the adjustment.  Pulling this boat out is not something you docasually.  I know that the propellerswere removed and sent off to be serviced by the manufacturer sometime after thecommissioning.  Whether the pitch was thesame when the propellers were returned I don’t know, but this seems the mostlikely point at which the pitch would have been changed, perhaps inadvertently.

All stuff to consider. 
In the meantime we plan to run the port engine as-is.  We found that all the glow plugs were dead(probably from a tricky control panel switch that keeps them on unnecessarily)so those are being replaced.  They reallyaren’t necessary in this climate, but anything that can raise the temperaturein the cylinders is a good thing.  Sincewe already had the injectors out, we figured it wouldn’t hurt either to havethem cleaned on the chance that a bad spray pattern was inhibiting combustion.  When that is all done and the engine is backtogether I’ll have to find another mechanic to come take it all apart again andgive me a second opinion before I consider going any further.

Update 11/03/08

After reassembling the engine with the new glow plugs and the rebuilt injectors it starts amazingly well.  Like immediately.  It still runs unevenly when it is cold, and it seems to not warm up as quickly, probably due to the water getting colder, but at least I don't have to crank it nearly as much.  The mechanic's bill was $1,500 and while I'm not pleased with some of his billing practices, I think it was money well spent.  The starboard engine has now begun starting sluggishly and probably needs the same treatment.  I'll be doing that one myself.


Getting the Shaft

As previously mentioned, we lost the port prop shaft during the delivery trip.  This occurred when we reversed the propeller to spin off some sea grass that had accumulated and was slowing us down.  Fortunately, the zinc nut on the shaft could not pass through the strut and the shaft stayed under the boat, but the end of it was inside the stern tube and could not be accessed from inside the boat.  This morning I had a diver down to the boat and he pushed the shaft back in for me.

One of the mysteries about the shaft problem was where the shaft key went.  This is a piece of 5/16" square rod that fits into grooves cut into the shaft and the coupling to keep the former from turning inside the latter.  The key should have been somewhere in the bilge, but it wasn't.  Improbably, it emerged from the shaft seal along with the shaft.  I had assumed that the last mechanic to pull the shaft put it back without the key.  I had gone through the trouble to take the starboard shaft out of its coupling and have that key duplicated.  Oh well, now I have a spare and the starboard side got new bolts and set screws in the bargain.

Getting these couplings apart was a bit of an adventure.  Being of light displacement, our boat's bilge is much shallower than that of a typical sailboat, but it has all the same stuff crammed into it.  Combining the tight quarters with some very stubborn bolts, the job looked impossible for many hours.  When confronted with this type of problem I usually end up at Home Depot staring at the tools I don't have and imagining how they could be employed.  In this case I bought about $150 worth (no such thing as too many tools!), but the answer lay in the $12 pipe wrench.  The first attempt with the pipe wrench failed for my lack of understanding how it works (well, have you ever used one?).  I think I would have nailed it on the first try with a chain wrench, but HD doesn't sell those.  Success came when I discovered that the pipe wrench's teeth are angled so that it only works in one direction.  You learn something every day.

Once I had it apart, I took it all over to General Propeller and they supplied me with a new shaft key and new set screws.  These set screws were drilled, so they can be wired and hopefully we can avoid this little exercise in the future.  One oddity was that all the set screws (two on each coupling) were 10mm, but one of the screws on the port coupling was 1/2.  Looks like maybe somebody couldn't get the screw out and ended up retapping it.  But the dimple on the shaft that the screw fits into wasn't any bigger.  I wonder if this could have contributed to the shaft slipping out.

The shaft seal itself was in bad shape and leaked heavily after the shaft was back in.  Fortunately, I had proactively purchased a spare on eBay and could replace it.  It had probably worn out and begun leaking during the delivery but wasn't noticed.  Turns out these seals are water lubricated and are supposed to be "burped" when the boat is put back in the water to avoid an airlock in the seal.  Even though it has a Volvo Penta part number (828416) stamped right on it, Volvo doesn't have any record of the part.  I've read elsewhere that this was equivalent to #828422, but this is for a 30mm shaft and mine is 32mm.  I'll keep an eye out for the 416's and buy any I find, but I should probably get a 422 just in case.

The port shaft seal is additionally challenged since it has to make up for an alignment issue on that side.  The way it has been explained to me, the stern tube and the strut are not aligned with each other, making it impossible to align the engine with both.  The correct solution is to rebore the stern tube, but that sounds like as much fun as getting a tooth pulled.  The more expedient remedy is to align the engine to limit the wear on the cutless bearings and accept the fact that they'll wear faster than usual.  With the misalignment the tolerances are so tight that the normal vibration of the engine transmitted to the shaft causes it to knock against the stern tube at some speeds which is not a pleasant sound.  Pretty much sounds like a hammer banging on the bottom of the boat.

Once everything was back together, I ran the engine at the dock for awhile, revving it up in forward and reverse.  Everything stayed together, but I didn't have the nerve to stress it in hard reverse.

The diver told me that I had barnacles growing on my propellers.  This was a surprise since I'd just had them treated with Propspeed.  I knew Propspeed wasn't an antifoulant, but didn't know that the barnacles could still adhere.  He said that if I ran my propellers periodically they would come off pretty easily in the wash.

Transfer Switch

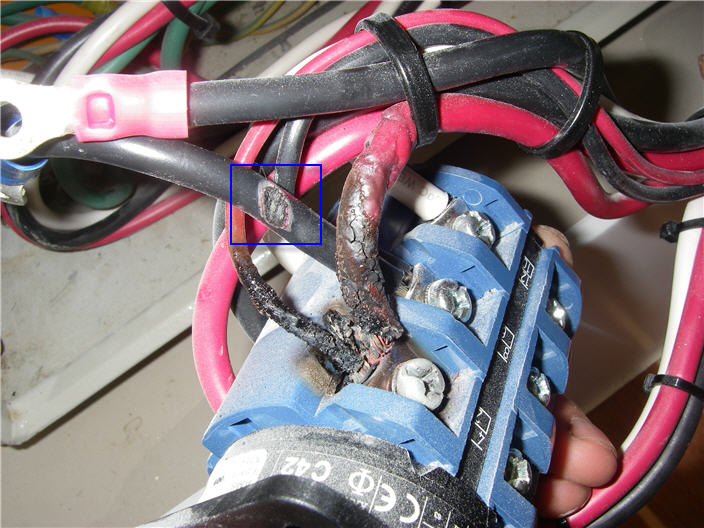
We had a small electrical problem a couple weeks ago.  While making breakfast and running the airconditioner one morning, we got one of the conductors in or 220V wiring hotenough to melt through the insulation and short against the otherconductor.  This caused our 50A shorepower breaker to trip.  That put an abrupt end to the air conditioning, battery charging, and pancakes.

The wires in question are 8 AWG and more than adequate forcarrying 50A at 110V.  I’ve seen thestove pull an impressive amount of power, but the breaker should have trippedlong before any wiring was damaged.  Ifour breaker failed to trip for some reason, there is another 50A breaker on thedock that would have.

Where the short occurred was immediately after the transferswitch that selects between shore power and generator, and I later discoveredthat the switch itself would no longer turn. 
Did the switch fail internally and cause the problem, or did a badwiring connection cause the heat buildup and melt something inside the switch?  I’m betting on the latter, since I discoveredsome corrosion in the connection.

The switch itself is a Kraus & Naimer C42 A212 and notthe kind of thing you can walk into a local store and pick up.  But I felt fortunate that the first call Imade to a marine electronics shop yielded the part in inventory.  It was in my hand two days and $275 later.

Replacing the switch and burned wire was unremarkable exceptfor the mechanical challenges of crimping 8 AWG.  Most crimpers only go down to 10 AWG.  I bought an uninsulated barrel and a crimperthat could handle 8, 6, 4, and 2 AWG. 
After crimping, I covered the splice with heat shrink tubing.   I did not put any type of dielectric grease onthe connection,  but I’m wondering if Ishould have given the corrosion.

In the current setup, the boat’s 220V ammeter only measuresthe black conductor the circuit.  I wonderif it would be advantageous to install a second ammeter for the red conductor.